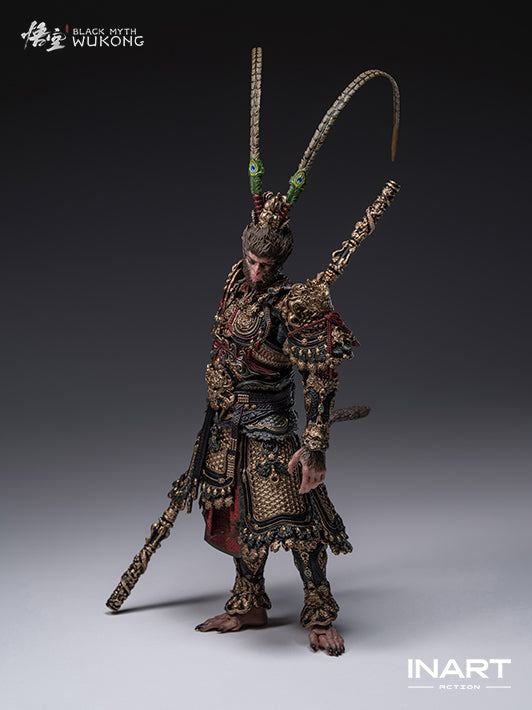
The Great Sage Has Finally Been Reforged
INART Action | Great Sage Armor Set 1/12 Scale Action Figure Development Interview

In the opening of Black Myth: Wukong, the Great Sage stands above the clouds, clad in golden armor with his staff raised, ready to face Erlang Shen and the Army of Heaven. How do you capture that in 1/12 scale? We sat down with the development team to revisit the design process from the very beginning. Together, we explore the challenges the team faced and how the golden armor was taken apart and reengineered to imbue the Great Sage with "Action".
01 | The Great Sage Beneath the Armor
INART Action: What does the Great Sage, and his portrayal "Black Myth: Wukong", mean to the team?
Development Team: Fundamentally speaking, he must look and feel like a monkey. In Black Myth: Wukong, his armor may be ornate, but you can very much feel that he is an active participant in the world, that he is the type to charge headfirst into action. So, very much not a distant observer, nor someone who would settle with being on the sidelines. With that in mind, questions regarding the range of motion of the figure can easily be answered by the character's nature — how far his shoulders can move, or how his torso should bend.
02 | From a Digital Model to a Physical Prototype
INART Action: When did development of the Great Sage Armor Set 1/12 Action Figure begin?
Development Team: Around August of 2024. When we started development of the Black Myth: Wukong 1/12 line, we knew that we had to make the Great Sage Armor Set at some point. The initial plan, though, was to start the line with an armor set that players would encounter early in the game, one whose appearance would remain unchanged when upgraded — the Bronze Armor Set.
We studied the various armor sets and mapped out the main sections: forearms, chest and abdomen, skirt armor, and leg armor. We wanted to establish an internal skeleton that could accommodate different armor sets. That was the starting point for the Bronze Armor Set, and we used the same skeleton for the Great Sage Armor Set.
INART Action: With the internal skeleton already in place and the digital model supplied by Game Science, what else was needed to turn it into a physical figure?
Development Team: We began working on the sculpt of the Great Sage Armor Set around November 2024. The original model supplied by Game Science was already highly detailed, but it was still a virtual asset. Turning it into a physical figure meant reworking and rebuilding it from the ground up. For example, we had to convert the model's flat surface elements into solid, three-dimensional parts.
INART Action: When the figure made its public debut, was it close to what the team had envisioned?
Development Team: Although we had just finished the first stage of early development for the sculpt and articulation, there was still room for improvement. We had a pop-up event coming up in January 2025, and we wanted to show the Great Sage Armor Set there. For the first version, we built onto the internal skeleton and quickly developed the initial garment patterns. While it looked complete at a glance, we knew that it was but a foundation from which to continue development.
The Great Sage Armor Set made its public debut on 20th January 2025 as an unpainted grayscale prototype. The soft goods did not have printed patterns yet, and a few design decisions had not yet been finalized. Only after the pop-up did we make decisions regarding the accessories and features, before moving onto the structural design of the figure.
Once the external appearance was decided on, the bulk of the iterations would focus on the internal structure. We knew we wanted to preserve the intricate layers of the Great Sage Armor Set while allowing the figure to properly articulate. In 1/12 scale however, this multi-layered design would prove quite a challenge.

03 | The Challenges of a Multi-Layered Armor Set
INART Action: What mattered to the team the most when it came to the torso?
Development Team: We wanted to preserve the logic of the armor design, achieve a good range of articulation, and retain the internal skeleton from the Bronze Armor Set. So, we set quite a few constraints for ourselves.
The team's north star was that the visual continuity of the design should never be broken when posing the figure. Every detail and part should look intact and not haphazardly sliced or cut into for the joints. Of course, the existence of so many layers meant segmenting them was a necessary process for the purpose of articulation. As such, the key was to hide those splits and seams so that moving the joints would not create large, visible gaps.

INART Action: How did the team go about the first attempt?
Development Team: Initially, we tried to ensure that each piece of armor was attached the way it was meant to be worn in the original design. Once we made it, though, we found that assembling everything that way created a very noticeable buildup of layers.
At full size, those layers worked with the armor's actual thickness. But at 1/12 scale, dividing it into so many individual pieces and layering them all on made it look very thick and bulky. While the articulation was not hindered, we knew there was room for improvement.
INART Action: What were some of the key issues?
Development Team: In the interest of authenticity, we had originally kept sections of the armor that would have been otherwise covered up, parts that were barely, if not visible at all. So, for our second approach, we removed these pieces so that the overall shaping of the armor would be less bloated and more closely resemble the silhouette of the in-game design. Most of the layers adjusted were around the chest, abdomen, and hips.

INART Action: We heard the team also tried a semi-enclosed belt design. Is that true?
Development Team: Yes. Rather than changing the material of the belt, we changed how it wrapped around the body. Think of an unfastened belt: it goes all the way around but does not form a fully closed loop. The ends are offset and overlap where they meet.
We wanted to make use of the many layers in the design. For example, one layer could wrap from front to back, and another from back to front. These two semi-enclosed structures would still look intact and would provide enough clearance for each other when the waist of the figure was bent.

INART Action: Did this design work?
Development Team: It freed up a significant amount of movement. But as the waist was being bent, the innermost layer started stretching outward and started pushing the outer layer as well. We ended up with a much too bulky look for the figure.
In this instance, we realized that this wasn't the ideal balance between the silhouette and the articulation, that there was more work to be done.
INART Action: How did the team strike the balance between the visual integrity of the design and the articulation?
Development Team: What we ended up doing for the final figure, is that we divided the armor into upper, lower, front, back, left and right sections. We also hollowed out certain parts to ensure the overall form of the figure remained sleek and compact.
To achieve this, we capitalized on the overlapping portions of the armor. If Part A covered a section of Part B, we could segment that section of B accordingly. What was once a single armor panel, then became split into upper and lower sections, with the split between the two covered by the waist sash.
Despite being physically separated, they still read as one continuous and singular piece visually. When the figure is moved, the sections only slightly shift, without major misalignments. This design gave the waist and abdomen the clearance needed for articulation while still preserving the armor's look.
The challenge at the waist and abdomen was the buildup of layers. For the shoulders, the challenge was how we could make the figure still convey a sense of force and motion when the figure was raising the staff. Where and how the shoulder armors were attached, and how they followed the arms both affected the dynamics of the pose.

04 | The Connections That Make Dynamic Articulation Possible
INART Action: How were the shoulder pads attached initially, and why were changes made?
Development Team: The initial design connected the shoulder pads with the chest armor. This resulted in a very rigid look, as if the entire trapezius area was locked in place. When we tried to have the figure in a staff-raising pose, it simply lacked force and presence.

INART Action: How did the team find a solution?
Development Team: The way the chest armor was fastened was key to the solution. It's worn like a vest, with the two straps over the shoulders connecting the front and the back pieces. We wanted to preserve the front view the most, keeping the attaching points and joints out of sight.
Since the chest armor of the figure was already securely in place, the figure's straps didn't have to connect to the chest armor pieces. We disconnected the straps at the front, slightly enlarged the two circular elements on the back, and converted them into ball joints.
Then we used an extension from each shoulder pad to connect it to the shoulder strap. The right-angle connection allows the pad to move with the arm and leaves ample room for articulation.

INART Action: Did the team face challenges when executing this idea in production?
Development Team: The idea came about early on, and we iterated upon it during the engineering process. During initial assessments, the connections between the shoulder pads and the straps were too thin and narrow, and needed additional reinforcement for a sturdy connection.
Later in development, we came up with the idea of heat staking. The connection point has a pin. Once the shoulder pad is fitted over it, heat is applied to deform the end into a rounded head. That head secures the pad onto the strap much like a nut, meaning that we did not need another separate joint component, and that was how we made this design a reality.

INART Action: Is there anything about this shoulder pad design that you would like to share with collectors?
Development Team: Yes! The pad can still rotate — it's something that can easily be missed. During the heat staking process, heat is applied to the end of the pin, which can lead it to slightly bond with the shoulder pad. Although it may feel stuck at first, collectors can gently free up the pad so it can rotate.
INART Action: Do the shoulder pads and bicep armor move in the same way?
Development Team: No. While the bicep armor was designed to be strapped to the upper arms, we wanted to make it less rigid. So, we added a connecting point on the upper arms for the armor to clip onto. When the arms move forward or backward, the armor follows and similarly allows for a greater range of movement.

INART Action: Once the shoulder articulation was figured out, were the sleeves still problematic?
Development Team: That was next thing we tackled, and we opted to use soft goods as fabric would minimize the amount of clearance issues.
What we ended up doing was that we fitted two fabric sleeves over the internal skeleton, to cover up the joints. By forgoing the sculpting of additional musculature, that meant the range of movement could be maximized.

Every development process features countless discarded ideas and concepts. These all bring us closer to the final, optimized design. The individually layered armor, the semi-enclosed belt, experiments such as these guide us during development, and greatly inform the final chest, abdominal and shoulder armor design. In a sense, these concepts live on, even in the final version of the Great Sage Armor Set that we proudly present to collectors today.